 Wearing a baby wrap is honestly no big deal. But if this is your first child and you are still adjusting into momma world, then I guess it’s probabaly a little bit intimidating at the beginning.
During my baby shower, mother-in-law bought me one beautiful bright and adorable Beluga Baby wrap. And later when I had to go grocery or simply outside, this thing was a blessing.
Today I’m going to sum-up whatever a first-time user needs to know about using one. Let’s talk more about how to use a baby wrap.
How to Use Baby Wrap with Some Complimentary Tips.
Once you grab the wrap, get your favorite coffee and take a seat comfortably. Usually, the stretchy baby wraps are considered best baby carrier for twins and single baby. So, let me tell you about a tutorial considering the stretchy type of baby wrap.
The Right Positioning.
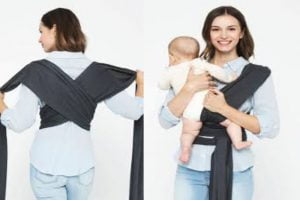
There should be a tag in the center section of baby wrap. You need to find that and place it across the chest. The tag should be facing outwards here. Starting around your bust is the right step. Don’t begin from your waist though.
Wrapping Behind.
Now you need to bring both ends behind you. Across your back, there should be an X shape while bringing these ends. Now gradually let those panels come up and over your shoulders.
The fabric should not twist. So, you need to keep it flat enough. A snug fabric against you is the right pick. However, it should never feel too constricting. It should be like a shawl, wide over your shoulder and still comfortable.
The baby needs to be at a height in which you can easily kiss him or her. You should make the wrap tight enough to adjust this height. Using both hands you need to bring one shoulder panel up and forward. So that there is no slack in the wrap. You should do exact thing for the other side as well.
Wrapping in the Front.
Now you will be making another X shape wrap, but this time on the front. Gran both panels into a ball inside your hand. Now through the panel with a label, you need to pull these. Let them go through the bottom. There should be no less snug feel, make sure of that. Now it’s time to cross them into an X shape. Both ends need to go behind.
Make sure the fabric is flat enough, snug and also comfortable. The panels should be pulled evenly across shoulder. So that balanced weight distribution is possible once you carry your baby.
Securing Wrap.
Using a double knot, secure the wrap after pulling panels behind. If there is extra length, then you can bring them in front again. You can practically tie them anywhere but just make sure to use a double knot. Personally, I prefer tying a knot on side since the pocket at one end becomes manageable this way.
Putting Baby Inside the Wrap.
 Legs-out is usually best way to keep the baby in wrap. However, some babies like to keep their legs inside, especially those who age only 6 to 8 weeks.
Start with panel pulling so that the label is down. It will be used at last. The panel that is close to your body is where you’ll put your baby first.
Start by placing your baby on the opposite shoulder. To support the baby, you can lean back a little bit. Now the closest panels need to be under baby’s leg. So that the strap can rest on their knee’s back part.
Now you can evenly spread fabric to both knee pit. Try to make an M like shape here. In this shape, your baby’s knees are a bit above their bum. Follow the exact format for other side as well.
Securing the Baby.
The front panel that has a tag on it needs your attention next. Grab and bring it over each leg of your baby. Let it go through your baby’s back all the way to their neck’s bottom part. That’s it, your baby should be cozily, securely and snugly fitted inside.
To add additional neck support, you can take one side panel and simply tuck it over the baby’s back head.
Always Keep the Wrap Snug but Not Too Tight.
It’s important that both you and the bay feel comfortable even with tightness. It should never be too much to feel uncomfortable. If you or the baby seem to feel difficulties, then do three things.
Start by undoing the wrap without a baby in it and tighten again. Ensure that a flat X is formed with straps across your back. For bigger babies, the X formed in your back should be in center or slightly higher.
A Right Size Wrap Means Right Using.
There are many sizes available for baby wraps. And this could make a huge difference if you grab the wrong size. Usually, woven wraps come from sizes 1 to 8. To select right size, you must consider the carries, fabric material and thickness and also your baby’s weight. There are also all-size wraps available these days. Usually, you can use these for petite to plus size wearers as they claim.
Your Baby Should Not Have Difficulty in Breathing.
You should do a simple test here. Place two fingers underneath the chin of your baby. If you are able to do so, then there should be no problem in breathing.
Also, make sure the baby’s chin is above her chest. So that there’s no obstacle in his or her airways, to allow comfortable breathing.
A Few Practices Will Be Necessary
Your baby might not be comfortable from the very first use. And the same goes for you as well. It would require you to use the wrap for a few minutes or a number of tries. Gradually both you and baby will become used to it.
A fussy baby might make a problem in getting inside. So, you need to make her relaxed by softly bouncing. Sometimes rubbing her back or whispering sweet stuff also helps. Some prefer rocking back and forth, this also works. You need to give the baby enough time to get adjusted. The same goes for yourself as well.
Conclusion
And you have the entire information on how to use a baby wrap now. I hope you can utilize the instructions and tips to wear and use one comfortably. The first few times might feel a bit overwhelming. But hang on there, it’s going to get easy gradually. Do your best to use this amazing carrier thing. And it would turn into a valuable baby asset for sure.